Archive
Gpg4win
Gpg4win
Gpg4win (GNU Privacy Guard for Windows) is an encryption software for files and emails.
What is Gpg4win?
Gpg4win enables users to securely transport emails and files with the help of encryption and digital signatures. Encryption protects the contents against an unwanted party reading it. Digital signatures make sure that it was not modified and comes from a specific sender.
Gpg4win supports both relevant cryptography standards, OpenPGP and S/MIME (X.509). Gpg4win is the official GnuPG distribution for Windows and is maintained by the developers of GnuPG. Gpg4win and the software included with Gpg4win are Free Software (Open Source; among other things free of charge for all commercial and non-commercial purposes).
Creation of Gpg4win was supported by the German Federal Office for Information Security (BSI).
Gpg4win Components
Gpg4win is an installer for Windows and contains several Free Software components:
- GnuPG – The core; this is the actual encryption tool.
- Kleopatra – A certificate manager for OpenPGP and X.509 (S/MIME) and common crypto dialogs.
- GPA – An alternative certificate manager for OpenPGP and X.509 (S/MIME).
- GpgOL – A plugin for Microsoft Outlook 2003 and 2007 (email encryption).
- GpgEX – A plugin for Microsoft Explorer 32bit (file encryption).
- Claws Mail – A complete email application with crypto support.
- Gpg4win Compendium – The documentation (for beginner and advanced users), available in English and German.
System Requirements
Gpg4win runs on Windows 2000, XP, Vista and 7. Both 32 and 64bit systems are supported.
The Outlook plugin GpgOL is compatible with Microsoft Outlook 2003 and 2007. Outlook 2010 is not supported.
Important: Currently, the Windows Explorer plugin GgpEX works with 32bit Explorer only. It is possible to use the 32bit Explorer on some 64bit Windows. A 64bit update is in progress. All file crypto features of GpgEX on Windows 64bit can be accessed from the file menu of Kleopatra (e.g. File > Sign/encrypt file).
Homepage: http://www.gpg4win.org/index.html
Manual Page: http://www.gpg4win.org/documentation.html
Download page: http://www.gpg4win.org/download.html
Outpost Security Suite
Outpost Security Suite, a complete Free Internet Security Suite for Windows
Agnitum has released Outpost Security Suite FREE v 7.1. It now includes a second anti-malware engine, this one specifically focused on spyware, adware and Trojan horses.

The unique combination of two modules (Antivirus and Antispyware) as an integral part of Agnitum’s comprehensive anti-malware brings more targeted security to Windows users.
Users of the free edition can also now switch between Automatic (default) and Manual update settings. Earlier, Outpost Security Suite FREE users were restricted to only one update a day. But now they can get it as soon as it is available.
The only difference between Outpost Free and Outpost Pro in this instance is that the Pro product is assigned greater bandwidth and operates in Priority Update mode.
This truly makes Outpost Security Suite FREE a complete Internet Security Suite!
In addition to the increased security protection, Agnitum has added a German-language interface to support its second largest global audience.
Benefits of Outpost Security Suite Free:
- The first fully-comprehensive free security suite
- The latest technology – based on Outpost Security Suite Pro 7
- VB100-certified antivirus
- Best-of-breed award-winning personal firewall
- Leak-test certified by Matousec.com
- Automatic and manual signature updates
- Automatic optimal configuration immediately on installation
- Lightweight solution that doesn’t slow systems down
- Full compatibility with Windows 7, Vista, XP, 2000 – both 32-bit and 64-bit.
Homepage: http://free.agnitum.com/
Windows Problems Remover is Malware
Windows Problems Remover
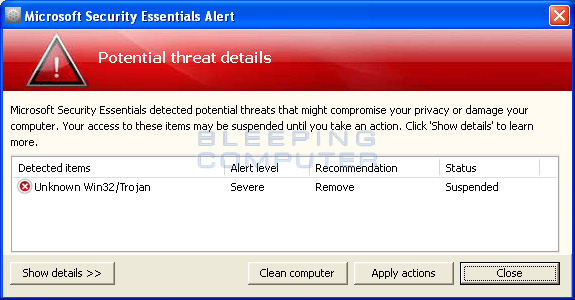
Windows Problems Remover is a fake rogue anti-spyware program that is part of the Fake Microsoft Security Essentials infection. When this infection is installed on your computer it will display a fake Microsoft Security Essentials alert that states that it has detected an Unknown Win32/Trojan on your computer.
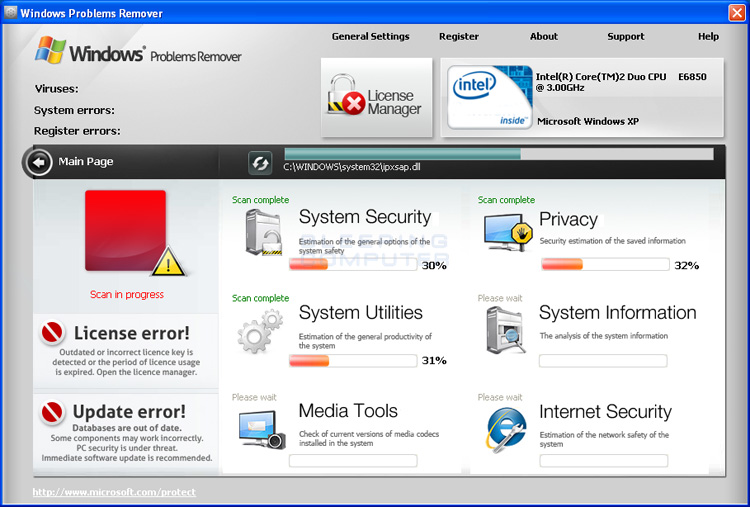
When your computer reboots you will be presented with the Windows Problems Remover screen before your normal Windows desktop is shown. It then prompts you to scan your computer, which will state that your computer is infected with numerous infections. In order to get to your normal Windows desktop, you will need to close the Windows Problems Remover program when it has finished its fake scan. As you can see this program is a scam as it is ransoming the proper operation of your computer until you purchase it. It goes without saying that you should not purchase this program for any reason.
While the program is running it will also display fake security alerts that are further used to scare you into thinking that your computer has a serious problem. Some of these alerts include:
System Security Warning
Attempt to modify register key entries is detected. Register entries analysis is recommended.
System component corrupted!
System reboot error has occurred due to lsass.exe system process failure.
This may be caused by severe malware infections.
Automatic restore of lsass.exe backup copy completed.
The correct system performance can not be resumed without eliminating the cause of lsass.exe corruption.
Warning!
Name: firefox.exe
Name: c:\program files\firefox\firefox.exe
Application that seems to be a key-logger is detected. System information security is at risk. It is recommended to enable the security mode and run total System scanning.
Just like the fake scan results, these alerts are also fake and are only being used to scare you into purchasing the program. Therefore, please ignore them.
As you can see, Windows Problems Remover was created to scare you into thinking your computer has a severe security problem so that you will then purchase this program. For no reason should you purchase Windows Problems Remover, and if you already have, you should contact your credit card company and dispute the charges stating that the program is a computer infection. Finally, to remove this infection, and any related malware, please use the removal guide below.
Automated Removal Instructions for Windows Problems Remover using Malwarebytes’ Anti-Malware:
- Print out these instructions as we may need to close every window that is open later in the fix.
- It is possible that the infection you are trying to remove will not allow you to download files on the infected computer. If this is the case, then you will need to download the files requested in this guide on another computer and then transfer them to the infected computer. You can transfer the files via a CD/DVD, external drive, or USB flash drive.
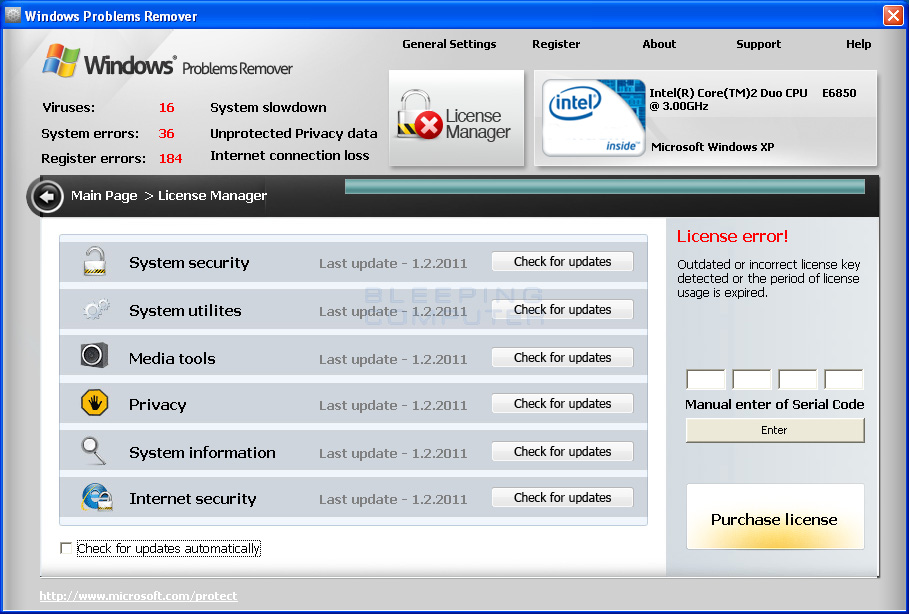
- The Windows Problems Remover infection will start before your normal Windows desktop appears. To access your desktop we first need to allow it to perform it’s fake scan. Therefore, when it tells you that it must perform a scan press the OK button to allow it to do so. Windows Problems Remover will now perform a fake scan and then state you need to open the License Manager. Press the OK, Open the license manager button. You will now be at a screen where you can close the program by clicking on the X at the top right of the Windows Problems Remover Window. Shown below is an image of the program screen that shows the location of the X, designated by the black arrow, that you should click on to close the program. Once you close the program, your Windows Desktop will load normally.Now that your Windows Desktop is available, we can continue with the rest of the removal process.
- Before we continue we should also terminate the Windows Problems Remover infection so that it does not interfere with the cleaning procedure. To do this, please download RKill to your desktop from the following link.
RKill Download Link – (Download page will open in a new tab or browser window.)
- When at the download page, click on the Download Now button labeled iExplore.exe download link. When you are prompted where to save it, please save it on your desktop.
- Once it is downloaded, double-click on the iExplore.exe icon in order to automatically attempt to stop any processes associated with Windows Problems Remover and other Rogue programs. Please be patient while the program looks for various malware programs and ends them. When it has finished, the black window will automatically close and you can continue with the next step. If you get a message that RKill is an infection, do not be concerned. This message is just a fake warning given by Windows Problems Remover when it terminates programs that may potentially remove it. If you run into these infections warnings that close RKill, a trick is to leave the warning on the screen and then run RKill again. By not closing the warning, this typically will allow you to bypass the malware trying to protect itself so that RKill can terminate Windows Problems Remover . So, please try running RKill until the malware is no longer running. You will then be able to proceed with the rest of the guide. Do not reboot your computer after running RKill as the malware programs will start again. If you continue having problems running RKill, you can download the other renamed versions of RKill from the RKill download page. All of the files listed there are renamed copies of RKill, which you can try instead. Please note that the download page will open in a new browser window or tab.
- Next we have to do is fix your Windows Registry Shell value. If we do not fix this entry and is deleted, then your Windows desktop will not be displayed the next time you reboot.To fix the Shell entry, simple download the following file to your desktop. If you are having trouble downloading the file, try right-clicking on it and selecting Save as.Shell.reg Download Link
- Once Shell.reg has been downloaded, locate it on your desktop and double-click on it. When Windows asks if you would like the data to be merged, please allow it to do so.
- Now you should download Malwarebytes’ Anti-Malware, or MBAM, from the following location and save it to your desktop:Malwarebytes’ Anti-Malware Download Link (Download page will open in a new window)
- Once downloaded, close all programs and Windows on your computer, including this one.
- Double-click on the icon on your desktop named mbam-setup.exe. This will start the installation of MBAM onto your computer.
- When the installation begins, keep following the prompts in order to continue with the installation process. Do not make any changes to default settings and when the program has finished installing, make sure you leave both the Update Malwarebytes’ Anti-Malware and Launch Malwarebytes’ Anti-Malwarechecked. Then click on the Finish button. If MalwareBytes’ prompts you to reboot, please do not do so.
- MBAM will now automatically start and you will see a message stating that you should update the program before performing a scan. As MBAM will automatically update itself after the install, you can press the OK button to close that box and you will now be at the main program as shown below.

- On the Scanner tab, make sure the the Perform full scan option is selected and then click on the Scan button to start scanning your computer for Windows Problems Remover related files.
- MBAM will now start scanning your computer for malware. This process can take quite a while, so we suggest you go and do something else and periodically check on the status of the scan. When MBAM is scanning it will look like the image below.

- When the scan is finished a message box will appear as shown in the image below.

You should click on the OK button to close the message box and continue with the Windows Problems Remover removal process.
- You will now be back at the main Scanner screen. At this point you should click on the Show Results button.
- A screen displaying all the malware that the program found will be shown as seen in the image below. Please note that the infections found may be different than what is shown in the image.

You should now click on the Remove Selected button to remove all the listed malware. MBAM will now delete all of the files and registry keys and add them to the programs quarantine. When removing the files, MBAM may require a reboot in order to remove some of them. If it displays a message stating that it needs to reboot, please allow it to do so. Once your computer has rebooted, and you are logged in, please continue with the rest of the steps.
- When MBAM has finished removing the malware, it will open the scan log and display it in Notepad. Review the log as desired, and then close the Notepad window.
- You can now exit the MBAM program.
Acronis Drive Monitor
Acronis Drive Monitor
Acronis® Drive Monitor is a free, downloadable software application developed by Acronis to monitor server, workstation and PC hard disk drives.
Acronis Drive Monitor checks disk health in the following three categories and reports deviations from normal operation to users, giving them an opportunity to replace affected drives prior to a potential total failure:
- State and health of physical drive (including temperature, seek error rate, spin-up time and more than 20 other indicators) via a disk-resident monitoring function called S.M.A.R.T. (Self-Monitoring, Analysis and Reporting Technology) is presented in a understandable form. Acronis Drive Monitor also supports other storage, such as non-S.M.A.R.T.-compatible RAID systems, via scripts.
- Critical events that may indicate an increased risk for data safety, even when S.M.A.R.T. output data shows no abnormalities. These include: logical file system corruptions on NTFS and FAT file systems, corruption of dynamic disk logical structure, failed read or write operations that might indicate faulty hardware or drivers, and Volume Shadow Copy service failures.
- State of disk backups. Acronis Drive Monitor users who also already use the latest Acronis home or business products, such as Acronis True Image Home, Acronis Backup and Security 2010 and Acronis Backup & Recovery® 10, will be alerted if the latest backup has failed or if a backup has not been created for a while. Otherwise, users will be automatically reminded of the need for a backup whenever a potential hard drive problem is detected.

License: Freeware
Homepage: http://www.acronis.com/homecomputing/products/drive-monitor/
Download page: http://www.acronis.com/homecomputing/download/drive-monitor/
ClamWin
ClamWin
ClamWin is a Free Antivirus program for Microsoft Windows 7 / Vista / XP / Me / 2000 / 98 and Windows Server 2008 and 2003.
ClamWin Free Antivirus is used by more than 600,000 users worldwide on a daily basis. It comes with an easy installer and open source code. You may download and use it absolutely free of charge. It features:
- High detection rates for viruses and spyware;
- Scanning Scheduler;
- Automatic downloads of regularly updated Virus Database.
- Standalone virus scanner and right-click menu integration to Microsoft Windows Explorer;
- Addin to Microsoft Outlook to remove virus-infected attachments automatically.
The latest version of Clamwin Free Antivirus is 0.96.1
Please note that ClamWin Free Antivirus does not include an on-access real-time scanner. You need to manually scan a file in order to detect a virus or spyware.
ClamWin Free Antivirus is based on ClamAV engine and uses GNU General Public License by theFree Software Foundation, and is free (as in freedom) software. To find out more about GNU GPL, please visit the following link: Philosophy of the GNU Project – Free Software Foundation.
Homepage: http://www.clamwin.com/
Download page: http://www.clamwin.com/content/view/18/46/
LiberKey Ultimate
LiberKey Ultimate
Liberkey is a collection of portable apps in a variety of categories that can be run on your local PC or from any portable media. Take these important apps with you and use on any computer.
Features:
* 100% mobility with portable applications
* A rigorous selection among more than 1800 applications
* Updates of LiberKey directly by Internet
* You can temporarily associate files extensions (.avi, .jpg, doc.,…) with LiberKey applications
* And, it is free, without virus, spyware, adware, popup, etc.
LiberKey Ultimate includes 168 free programs in the following categories:
* Audio
* CD/DVD
* File Management
* Graphics
* Internet
* Network
* Office
* Security
* System Utils
* Video
The complete list of all programs available on LiberKey: http://www.liberkey.com/en/suites/liberkey-ultimate.html
OS: Windows 2000/XP/Vista/7
Size: 209MB
License: Freeware
Homepage: http://www.liberkey.com/
Download (english version): http://download.liberkey.com/lbk/LiberKey_Ultimate_EN.exe
Disable User Account Control (UAC) the Easy Way on Win 7 or Vista
Disable User Account Control (UAC) the Easy Way on Win 7 or Vista
User Account Control (UAC) is a technology and security infrastructure introduced with Microsoft’s Windows Vista and Windows Server 2008 operating system. It aims to improve the security of Microsoft Windows by limiting application software to standard user privileges until an administrator authorizes an increase or elevation. In this way, only applications trusted by the user may receive administrative privileges, and malware should be kept from compromising the operating system. In other words, a user account may have administrator privileges assigned to it, but applications that the user runs do not inherit those privileges unless they are approved beforehand or the user explicitly authorizes it
This is an easier method that you can use to do the same thing from the GUI interface in either Windows 7 or Vista. To recap my earlier article, UAC is ANNOYING.
Note: Disabling UAC will lead to a less secure system, so be warned.
Disable UAC on Windows Vista
Open up Control Panel, and type in “UAC” into the search box. You’ll see a link for “Turn User Account Control (UAC) on or off”:

On the next screen you should uncheck the box for “Use User Account Control (UAC)”, and then click on the OK button.

You’ll need to reboot your computer before the changes take effect, but you should be all done with annoying prompts.
Disable UAC on Windows 7
Windows 7 makes it much easier to deal with UAC settings, and in fact you don’t have to completely disable UAC if you don’t want to. Just type UAC into the start menu or Control Panel search box.

You can simply drag the slider up or down, depending on how often you want to be alerted.

If you drag it all the way down to the bottom, you’ll have disabled it entirely.
Microsoft Security Essentials
Microsoft Security Essentials
Microsoft Security Essentials (codenamed Morro) is a free antivirus software created by Microsoft that provides protection against viruses, spyware, rootkits, and trojans for Windows XP, Vista, and 7. Microsoft has always recommended that its users use real-time antimalware protection, but the release by the end of this year will mark the company’s first free solution.
MSE replaces Windows Live OneCare — a subscription antivirus service — and Windows Defender, which only protects users from adware and spyware. MSE is a small-footprint program ideal for computers that lack processing power or broadband Internet connections, such as netbooks.
MSE is available as standalone 32-bit and 64-bit downloads for Windows XP, Windows Vista, and Windows 7. It’s very easy to install Security Essentials using it is even easier than one might expect.
Updates and upgrades are automatic, so there’s no need to worry about having the latest protection. It’s easy to tell if you’re protected – when the Security Essentials icon is green, your status is good. It’s as simple as that.
Microsoft announced Morro on November 18, 2008. It marked a change in Microsoft’s consumer antivirus marketing strategy. Instead of offering a subscription antivirus with a host of other tools — parental controls, photo backup, and a firewall, Morro would be free for all genuine installations of Windows and simply offer protection against malware. Microsoft Forefront will be offered alongside Morro, with central management tools not present in Morro.
While OneCare offered a Managed Firewall, PC Performance Tuning, Data Backup and Restore, Multi-PC Management, and Printer Sharing, MSE is really closer to Forefront Client Security, Microsoft’s antivirus product for the enterprise.
MSE is a basic security suite designed for consumers but based on the Forefront Client Security desktop agent, solely providing malware detection and removal, but lacking Forefront Client Security’s centralized management features. It includes the same antimalware engine (dubbed “Microsoft Malware Protection Engine”, or MSMPENG for short), and virus definitions that all other Microsoft desktop antimalware products share, including Forefront Client Security, Windows Live OneCare, and Windows Defender (Defender excludes the antivirus definitions[citation needed] which are separate from the antispyware definitions). Before installation, MSE checks for a validated copy of Windows. No registration or personal information is required. The program will disable Windows Defender, as it provides protection against malware, not limited to spyware and adware.
Updates are published 3 times a day to Microsoft Update. Using default settings, archived files are decompressed, and then scanned. File downloads and e-mail attachments are also scanned. Its Dynamic Signature Service attempts to better identify malicious files by checking for updates if an application exhibits suspicious behavior. Before taking action against a suspect file, MSE prompts for user input. If no response is received in 10 minutes, then the suspected malware is handled according to its default action, letting MSE determine what to do with the malware. System Restore points are created before removing found malware.
Microsoft touts five features of Microsoft Security Essentials:
• Remove most-prevalent malware
• Remove known viruses
• Real-time anti-virus protection
• Remove known spyware
• Real-time anti-spyware protection
OS: Windows XP (32Bit)/Vista (32 and 64Bit)/7 (32 and 64Bit)
License: Freeware
Homepage: http://www.microsoft.com/security_essentials/default.aspx
Download version for XP for 32 BIT:
- ITA version: http://download.microsoft.com/download/9/D/F/9DFBA9B6-FFA2-4762-ABFE-72133C338ED1/mssefullinstall-x86fre-it-it-xp.exe
- ENG version: http://download.microsoft.com/download/A/3/8/A38FFBF2-1122-48B4-AF60-E44F6DC28BD8/mssefullinstall-x86fre-en-us-xp.exe
Download for Vista/Seven for 32 BIT
- ITA version: http://download.microsoft.com/download/9/D/F/9DFBA9B6-FFA2-4762-ABFE-72133C338ED1/mssefullinstall-x86fre-it-it-vista-win7.exe
- ENG version: http://download.microsoft.com/download/A/3/8/A38FFBF2-1122-48B4-AF60-E44F6DC28BD8/mssefullinstall-x86fre-en-us-vista-win7.exe
Download ITA version for Vista/Seven for 64 BIT:
How to Reinstall Windows XP Without Having to Reactivate With Microsoft
How to Reinstall Windows XP Without Having to Reactivate With Microsoft
Users who reformat their hard drive and perform a clean installation of the operating system will find that they need to reactivate the product. But, as long as the new installation is on the same system and there won’t be any hardware changes it is possible to transfer the existing product activation and skip having to go through the product activation process again. Follow the steps below to save the activation status information and restore it once your system is rebuilt:
- Double-click My Computer
- Double-click on the “C” drive
- Go to the C:\Windows\System32 folder (you may have to click on the link that says “Show The contents of this folder”)
- Find the files “wpa.dbl” and “wpa.bak” and copy them to a safe location. You can copy them on a floppy drive or burn it onto a CD or DVD.
- After you have reinstalled Windows XP on your reformatted hard drive, click “No” when asked if you want to go ahead and go through the activation process
- Reboot your computer into SafeMode (you can either press F8 as Windows is booting up to see the Windows Advanced Options menu and select SAFEBOOT_OPTION=Minimal or follow the instructions in Starting Windows XP in SafeMode
- Double-click My Computer
- Double-click on the “C” drive
- Go to the C:\Windows\System32 folder (you may have to click on the link that says “Show The contents of this folder”)
- Find the file “wpa.dbl” and “wpa.bak” (if it exists) and rename them to “wpadbl.new” and “wpabak.new”
- Copy your original “wpa.dbl” and “wpa.bak” files from your floppy disk, CD or DVD into the C:\Windows\System32 folder
- Restart your system (if you followed the directions in Starting Windows XP in SafeMode you may need to go back into MSCONFIG to turn off booting into SafeMode)
Voila! Your Windows XP operating system is now reinstalled on your reformatted hard drive and you are all activated without having to actually go through the product activation process!Remember though.
This won’t work for transferring activation information from one computer to another or if you alter the hardware because the information contained in your “wpa.dbl” file will not match the configuration of the computer.
This trick is only for reinstalling Windows XP on the exact same computer after formatting the hard drive.
Hiren’s BootCD
Hiren’s BootCD is a wonderful live CD containing various programs such as:
- Hard drive recovery
- Hard Drive Partition
- Hard Drive Backup
- Hard Drive Testing
- RAM (Memory) Testing
- System Information
- MBR (Master BootRecord)
- BIOS
- MultiMedia
- Password
- NTFS (FileSystems)
- Antivirus
- AntiSpy
- Process
- Windows Startup
- Registry tools
- Windows Cleaners
- Optimizers
- Tweakers
- and many others…
As it is a bootable CD, it can be useful even if the primary operating system cannot be booted. We may call it as an emergency cd which every computer technician or home user must have.
Homepage: http://www.hiren.info/pages/bootcd

Recent comments